
How to create a private AI team wiki for employees
Give employees one protected place to ask questions across approved internal documents, then prove access control and answer quality before launch.
To create an AI team wiki safely, you need approved knowledge sources, deliberate access controls and a real employee question that proves retrieval.
A Team Wiki turns the approved sources of one WebChatAgent assistant into a separate question-and-answer site. Employees open a dedicated subdomain, pass the configured access check and ask plain-language questions instead of searching several folders, files and systems.
The difficult part is not choosing a color or subdomain. It is defining which documents are authoritative, who owns them, who may read them, how missing information is handled and how quickly access can be disabled during an incident.
This walkthrough uses a dedicated assistant named Internal Team Wiki, the private site Northstar Internal Wiki and a small fictional source containing the unique escalation code NORDSTERN-42. The password gate and the answer were verified end to end in the real interface. Never copy real secrets into tutorial data.
Privacy-protected two-click player
How to Create a Private AI Team Wiki for Employees
Create an AI team wiki with approved sources, private access, password protection, branding and a verified employee answer from internal knowledge.
The YouTube player stays blocked until you choose Play. Loading it connects your browser to YouTube and may transfer technical data to Google.
Open directly on YouTubeWhat you will have at the end
- A dedicated internal assistant separated from any public widget
- Approved, owned and testable internal knowledge sources
- A configured subdomain, access mode and employee-facing brand
- A verified password gate, known-answer test and safe missing-answer expectation
- An operational owner who can edit, disable or retire the wiki
Before you start
- Standard plan or higher
- An approved internal source with a clear owner
- Premium or Enterprise for native Confluence and Notion connectors
- A decision between password, member login and public access
- For a password pilot: one unique test password stored outside screenshots, narration and source files
- An isolated test assistant and an owner who can delete the test wiki and conversation after verification
Separate knowledge, access and operations
The selected assistant supplies websites, files, Confluence spaces and Notion databases. The Team Wiki settings supply the employee-facing address, appearance and access gate. Neither layer replaces source governance.
Use a dedicated wiki assistant. Password protection disables the normal website widget for that assistant, while Login Required relies on individual owner or invited-member accounts. A separate assistant prevents internal access choices from interrupting public support.
Treat the active wiki as a service: assign an owner, review sources on a schedule, test known and unknown questions, monitor gaps and keep the Disable action ready for access or content incidents.
01–09
Set it up step by step
Create a dedicated Team Wiki assistant
Keep internal sources and access rules away from your public chatbot.
Create a new assistant and give it an unmistakable internal name such as “Internal Team Wiki”. In Configuration, choose an English default language for this capture, enter an internal-facing service and channel name and write a system role that answers from approved sources, admits missing information and points employees to the correct policy owner.
Start with a fast general-purpose model and a moderate temperature. A larger model cannot repair duplicate, outdated or contradictory policy documents. Keep this assistant out of the public website and record an operational owner before adding sensitive sources.
Begin with one department and one narrow topic. For example, an IT wiki can cover escalation paths and approved troubleshooting, while HR policies remain in a separately governed assistant until access requirements are confirmed.
- Dedicated assistant, never the public support bot.
- One owner and one initial department.
- Role must allow a clear “I do not know” response.
Add approved, testable knowledge
The wiki can answer only as well as this assistant’s indexed sources allow.
Open Data Sources and add only maintained websites, files, Confluence spaces or Notion databases that this audience is allowed to read. Record a source owner, review date and sensitivity level outside the chatbot. Give every source a descriptive name and category so duplicates are easy to spot.
Prepare documents for retrieval: use clear headings, one topic per section, explicit dates and complete sentences. Remove obsolete versions, scanned-only pages and repeated copies before indexing. Wait for Completed instead of testing while indexing is still running.
The verified example uses the fictional file `internal-demo-knowledge-base.pdf` with one unique fact: “The internal escalation code for urgent service incidents is NORDSTERN-42.” This value is safe, memorable and specific enough to prove that the intended source was retrieved.
- Approve access before indexing.
- Remove stale and duplicate versions.
- Use one unique, fictional verification fact.
Open AI Team Wiki and read the limits
Confirm the selected assistant and employee-support path before creation.
Stay inside the dedicated assistant, open Integrations and select AI Team Wiki. The card shows whether a wiki already exists and provides Create Team Wiki. Confirm the assistant name at the top so an internal wiki is never attached to the wrong source set.
Read the visible warning: Live chat and human takeover are not available inside Team Wiki. Decide where an employee goes when the answer is missing or urgent, such as an IT service desk, HR mailbox or incident hotline, and include that route in the welcome message or source content.
- Confirm the assistant before clicking Create.
- Plan escalation outside the wiki.
- Do not promise human takeover inside this interface.
Set the title, subdomain and access model
The URL is public metadata even when the content is protected.
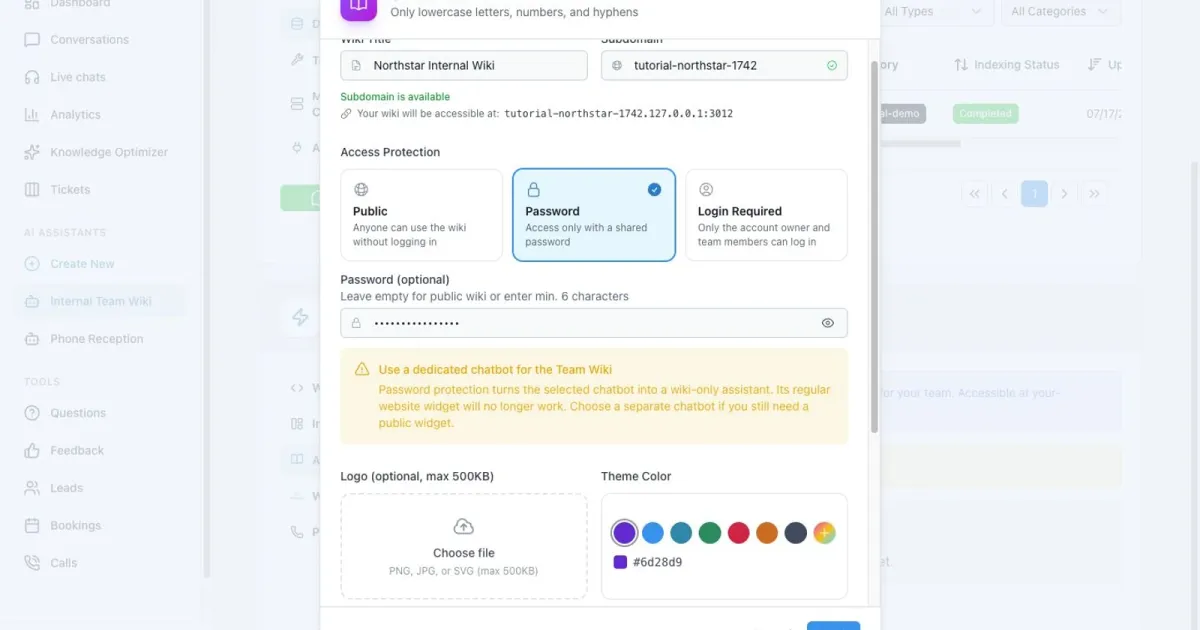
Select Create Team Wiki, enter a recognizable title such as “Northstar Internal Wiki” and choose a neutral subdomain that does not reveal confidential project names. Wait until the availability indicator turns green before continuing.
Choose access from the real audience and risk level. Public allows anyone with the link, so use it only for information approved for public disclosure. Password provides a shared gate but weak accountability. Login Required limits access to the owner and invited team members with individual accounts and is usually the stronger choice for revocation and audit.
For a pilot, write down who can approve each access change and how former employees are removed. Access to the wiki does not automatically make every connected document appropriate for every employee. Split assistants when departments need different source permissions.
- Use a neutral, non-sensitive subdomain.
- Prefer individual login for accountable access.
- Separate assistants when source permissions differ.
Understand the password-mode warning
Password protection changes how this assistant can be used elsewhere.
Select Password and enter a strong, unique test secret through the UI. Do not reuse an employee, administrator or production password. The yellow warning explains the critical effect: an assistant protected this way becomes a dedicated Team Wiki assistant, and its normal website widget no longer works.
If a public website currently uses this assistant, stop here. Create a separate assistant, copy only approved internal sources and repeat the setup there. Otherwise enabling password mode could replace a working public chat experience with a password prompt.
A shared password is suitable only when your policy permits it and a rotation owner exists. Store and distribute it through an approved password-management channel, never in the welcome message, source documents, tutorial screenshots or video narration.
- Stop if this assistant powers a public widget.
- Use a unique test secret and an approved sharing channel.
- Assign password rotation and revocation ownership.
Explain scope with branding and options
A familiar appearance helps; a precise welcome message prevents misuse.
Upload an optional company-approved logo and choose a readable theme color with sufficient contrast. The welcome message should name the covered department and topics, the source review date, the fallback for missing or policy-critical answers and a reminder not to upload secrets.
Enable File Upload only when employees are allowed to send files into this conversation workflow and retention, access and deletion are documented. Leaving it off is the safer pilot default. “Activate wiki immediately” publishes the subdomain as soon as Create is selected; turn it off if a separate security or content review must happen first.
Before creating, read the complete form from top to bottom: title, subdomain, access protection, logo, color, welcome message, file upload and activation. Then select Create once. Repeated clicks can make troubleshooting harder while the service is provisioning.
- State scope, freshness and fallback in the welcome.
- Keep file upload off unless governance is ready.
- Delay activation when review is still required.
Verify access in a private session
Test the direct URL as an unauthenticated employee would see it.
Copy the generated subdomain and open it in a new private browser session with no dashboard login. Password mode must show Wiki Access before any title, source text or chat history reveals internal information. Login Required must send the visitor to the member-login flow instead.
Try one incorrect password first. Access must remain blocked without a revealing error. Then enter the correct test password and confirm that the wiki opens. Repeat the direct-URL test after logout; hiding the link in the dashboard is not access control.
For member login, test with one authorized pilot user and one unassigned account. Record only pass/fail evidence, never credentials. Remove test membership when the final capture is complete.
- Use a private session with no dashboard cookies.
- Test wrong, correct and post-logout access.
- Never capture or narrate the secret.
Prove a known answer and a safe unknown
A successful login proves access; a fixed question proves retrieval quality.
Ask the exact verification question: “What is the internal escalation code?” The expected result is NORDSTERN-42, because that fact appears once in the approved fictional source. In the verified run, the real Team Wiki answered: “The internal escalation code for urgent service incidents is NORDSTERN-42.”
Now ask a deliberate unknown, such as “What is the 2028 travel-expense limit?” when no approved source contains that policy. The safe expected behavior is to state that the information is unavailable and point to the owner or fallback path. A confident invented amount is a failed test.
Repeat both questions with two natural phrasings and, if the wiki serves multiple languages, in each supported language. Record question, expected fact, observed answer, source version, model and date. Re-run this small test set after source, prompt or model changes.
- Known fact: NORDSTERN-42.
- Unknown policy must not receive an invented value.
- Repeat the same test set after every meaningful change.
Operate, review and disable safely
The active card is the control point after launch.
Return to Integrations → AI Team Wiki. The active card shows the subdomain, creation date and Active status. Confirm that the displayed address matches the tested private URL and record the service owner and next review date.
Use Open for routine checks and Edit for planned access, branding or option changes. Use Disable as the first response when the wrong audience can enter, a sensitive source was indexed, answers become unsafe or the owner is unavailable. Disable is reversible and reduces exposure while the incident is investigated.
Reserve Delete for deliberate permanent retirement after export, retention and communication obligations are complete. Review failed questions and source freshness on a schedule, remove duplicate or expired documents, rotate shared passwords and re-run the known/unknown test set before expanding to another department.
- Open for checks, Edit for planned change, Disable for incidents.
- Delete only after a documented retirement decision.
- Review sources, access and test answers on a fixed schedule.
Example & result
See the practical test and its result
Every tutorial includes a fixed input, the expected outcome and a transparent record of what was actually verified locally.
Practical example: How to create a private AI Team Wiki for employees
This exact scenario was completed with the temporary tutorial account.
Exact test input
Ask the private wiki: “What is the internal escalation code?”
Expected result
The password gate appears before the wiki and the answer contains NORDSTERN-42 from the approved internal document.
What was actually verified
The private subdomain required the configured password. After login, the real Team Wiki answered NORDSTERN-42 from the indexed internal source.
Tips & tricks
Make the setup reliable
Test with realistic examples, record your baseline and change one setting at a time. That makes real improvements visible.
Write documents for retrieval
Use clear headings, one topic per section, explicit dates and complete statements. Scanned pages, unexplained tables and repeated copies make answers less reliable.
Give every source an owner
Record who approves the content and when it must be reviewed. Remove expired policy versions instead of leaving the model to choose between them.
Use member login for accountable access
A shared password is quick, but individual accounts are easier to revoke and audit. Wiki only members can use the wiki without seeing the dashboard.
Start with a fixed evaluation set
Keep five known questions, two unknown questions and expected source evidence. Re-run them after every source, role or model change.
Troubleshoot in the right layer
Access fails: check mode and membership. A fact is missing: check indexing and source wording. Contradictory answers: remove duplicate versions. Do not change the model before proving the content is sound.
When something does not work
Troubleshooting
Check status, permissions and test data systematically before changing the model or prompt.
Create Team Wiki is unavailable
Confirm the account plan, owner role and selected assistant. One assistant can have only one Team Wiki, so remove only a known disposable test wiki or choose a clean dedicated assistant. Never delete an unfamiliar wiki to clear the button.
The subdomain is not available
Choose another neutral lowercase test value and wait for the availability response. Do not append confidential project, customer or employee names. Record the final address before testing the direct URL.
The wrong password opens the wiki or reveals content
Stop the pilot immediately. Disable the wiki from the dashboard, preserve only non-secret failure evidence and investigate auth mode, cached session tokens and direct-route enforcement before another test.
The correct password keeps failing
Avoid repeated attempts because the public gate is rate-limited. Check that the intended wiki and URL are selected, rotate the shared test password through Edit if authorized, then retry once in a fresh private session.
The wiki cannot answer NORDSTERN-42
Return to the dedicated assistant. Confirm the fictional source is Completed, contains the exact fact once and has no competing version. Test the same question in the assistant before changing the model or access settings.
Ready for a production-style test
Run a two-week pilot with one department. Track failed questions, access requests, source owners, review dates and answer-test results. Expand only after duplicates are removed, the unknown-answer fallback works and an incident owner can disable the wiki quickly.